How to add new Nomenclatures (NUTS) to the database
In progress
Last update
Introduction
This section describes how it is possible for the system administrator to add new geospatial data for NUTS type nomenclatures.
it is important to underline that with this operation it is possible only to add new nomenclatures (NUTS) without deleting the existing ones. Deleting preexisting nomenclatures also means eliminating the indicators associated with them.
For these operations it is necessary:
- to have administrator access to the database
- to use a SIG software for data preparation
- to use a PostgreSQL client to perform some database operations
- to have an account to be able to publish the resulting layers through GeoServer.
1) Prepare the GIS file according to the guidelines
In order to be coherent with the already included nomenclatures, the data should come from Eurostat Reference Data (GISCO database) available at: https://ec.europa.eu/eurostat/web/gisco/geodata/reference-data
The data must have a well-defined format, including all the geometries and the attributing values in a single file, which includes the four levels (0 to 3) of administrative resolution of the NUTS.
The following table gives a guideline of attributes. It is important to respect the field naming.
field name | Type | Lenght | comment |
stat_levl_ | int4 | 32 | Mandatory: 0 = NUTS0 -> 3 = NUTS3 |
nuts_id | varchar | 5 | Mandatory: Official nut ID from GISCO |
name_ascii | varchar | 255 | Mandatory: it is the Official GISCO nomenclature name in ASCII |
eu28_4 | int4 | 32 | Mandatory: 1 = nomenclature belongs to EU 28 + 4 Partner States |
eu28_cc_4 | int4 | 32 | Mandatory: 1 = nomenclature belongs to EU 28 + 4 Partner States + Candidate Countries |
eu28 | int4 | 32 | Mandatory: 1 = nomenclature belongs to EU 28 |
tc | int4 | 32 | Mandatory: 1 = nomenclature belongs to Territorial Cooperation (TCA) |
version_ | int4 | 4 | Mandatory: year of reference for nomenclatures in four digits (example: 2016) |
gid | int4 | 32 | Mandatory: unique identifier. NB values will be successively automatically re-calculated in order to avoid any duplicates |
The projection of the dataset must be ETRS 1989 in Lambert Azimutal projection with center in E52N10, coordinates in meters (EPSG 3035)
You can find an example of a GIS file (in Geopackage format) by clicking on the link: example for NUTS 2016
Take care...
During these operations it is essential that:
- field names must be the same as in the table above
- fields type must be the same as in the table above
- GIS file must be in EPSG 3035
Tip: for any doubts please refers to the template: example for NUTS 2016
2) Import the GIS file in the (geo)database
This section explains how to import the GIS file into the database. The open source software QGIS (https://www.qgis.org) is used, but obviously other solutions are quite possible.
We strongly suggest saving the GIS file in GeoJson or Geopackage format. The shapefile format could possibly cut the name of some locations if they were particularly long ...
2.1 Connect to the Epson database
You can connect to PostgreSQL easily through the QGIS interface, as explained in the following picture:
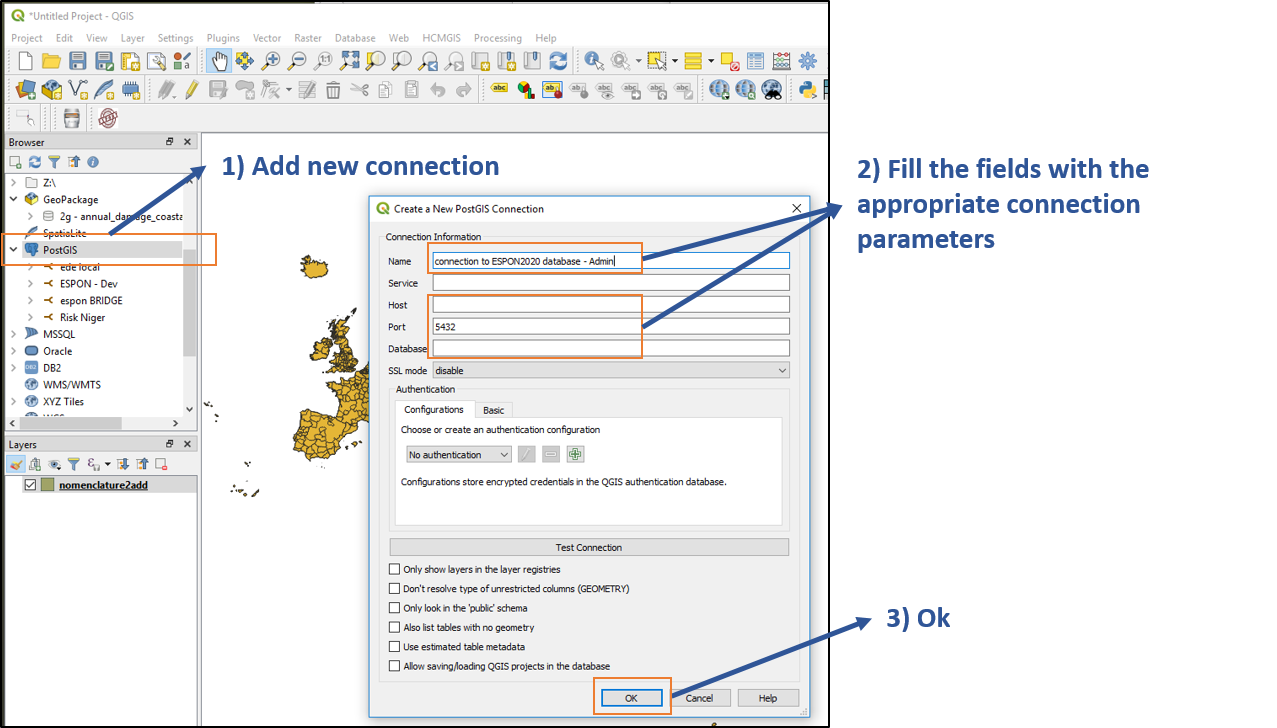
Connection to the DB (Click to enlarge)
2.2 Import the GIS file into the "gis" schema of the database
Once the connection is established, it is possible to start importing the GIS file into the database.

Import to the DB first step (Click to enlarge)
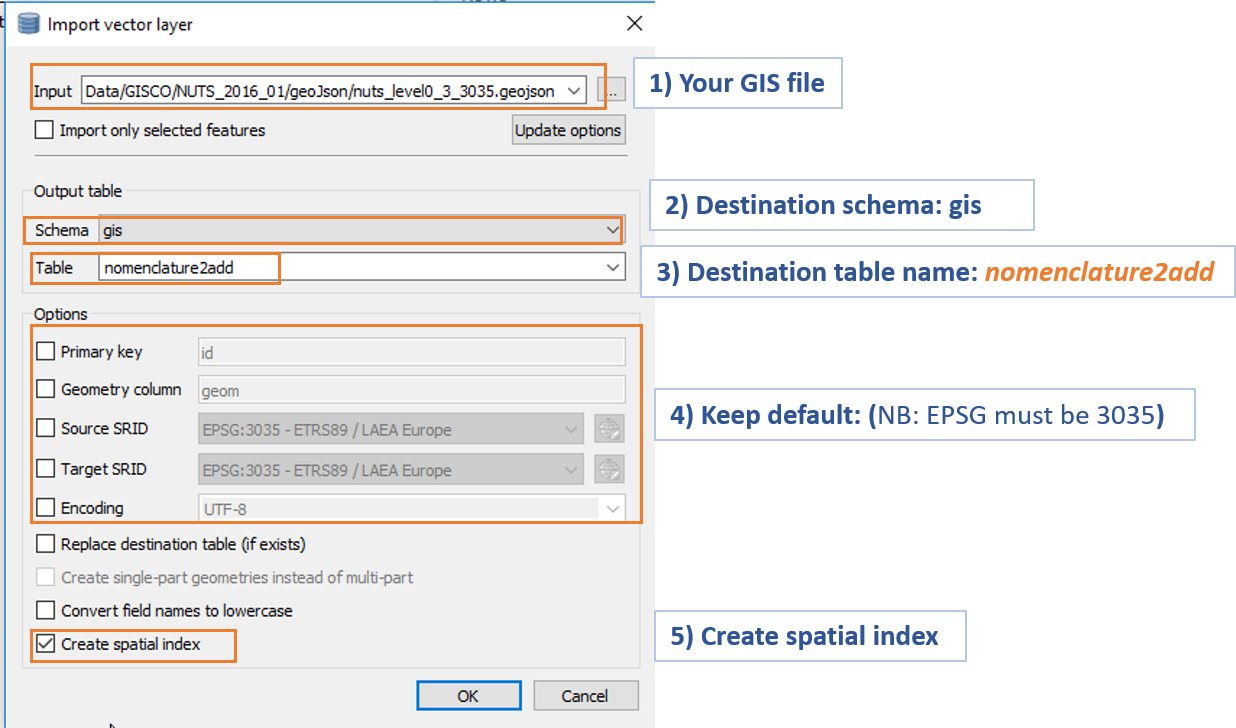
Import to the DB second step (Click to enlarge)
Take care...
During these operations it is essential that:
- the GIS file is inserted in the PostgreSQL scheme called "gis"
- the resulting PosrGis table must be named "nomenclature2add"
3) Process and check the data through a PostgreSQL function
Once the nomenclatures have been introduced into the database, the administrator simply has to launch a specific function.
in order to do this, you must have a PostgreSQL client such as PgAdmin, Navicat or other.
This function allows to:
- generate unique identifiers for each new geometry.
- Establish hierarchical relationships between the various NUT levels, which will be written in a specific table.
- Establish the spatial extension for each country grouped according to a specific category: eg EU 28, EU 28+ 4 etc. This information is written in a special table.
- Finally update the main table that contains all the database nomenclatures
- Generate a temporary table called test_nomenclature in order to check outputs before to commit to the operational database
Once connected to the database (administrator account), execute a new query (on the to the gis schema) in order to launch the function nomenclature_prepare() and successively visualize a test table (test_nomenclature) to check the processed values (hierarchy relations) :
SELECT * FROM gis.nomenclature_prepare();
SELECT * FROM gis.test_nomenclature;
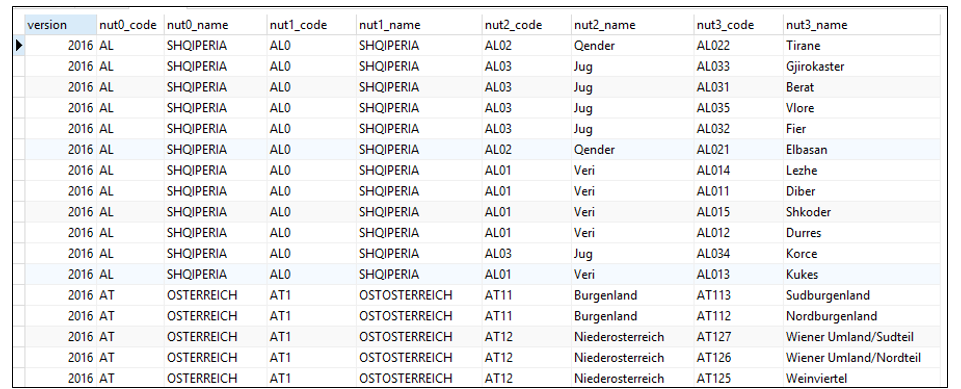
Example of the test_nomenclature table (Click to enlarge)
In addition to the test table previously mentioned, the nomenclature_prepare() function will also generate three new tables (edp_core_trel_spatial_ext_gis_test, edp_core_trel_tunit_hierarchy_test, edp_core_tdta_gis_test), which will subsequently be inserted in the "public" database schema.
4) Commit to public schema
All these operations are performed in a reserved area of the database, it is therefore possible to verify the outcome of the operations before definitively transferring the new nomenclatures to the operating area of the database
The last step, therefore, provides the transfer the new nomenclature table to the "public" database schema.
to do this it is necessary to launch another function called nomenclature_add():
SELECT * FROM gis.nomenclature_add();